
Today, most laptop models use laptop fans to suck and bring cool air around the device; it helps cool down the internal details. Yet, after a period of operation, dust and many other types of dirt will stick to the propeller more and more.
So, how to clean a laptop fan? There are 2 methods including with compressed air and without compressed air to solve this situation.
For more details, LaptopBatteryOne will guide you to clean a laptop fan in today’s article. Now, let’s read on to discover!
How to clean a laptop fan
Contents
Consequences Of Not Cleaning The Laptop Fan In Time
The electronic components located densely inside the laptop are capable of stable operation at a specific temperature. However, if the temperature increases for a long time, the electronic circuits will begin to degrade or even be completely damaged.
Manufacturers have equipped computers with automatic shutdown functions to protect components and prevent a fire if overheating is detected.
Imagine how annoying it would be if you were working and the laptop kept restarting because it exceeded the allowable temperature threshold.
When the temperature is high, the processor will also slow down, thereby reducing the device’s performance.
The amount of dirt when entering the inside is also one of the leading causes of severe damage. If they accumulate too much, these agents will reduce the ability to conduct electricity and corrode or cover the contact pins of the components.
For more details, you can check this video below:
Related:
- 12 Simple Ways To Cool Down Laptop: Expert’s Detailed Instructions
- How To Clean Laptop Screen And Keyboard Properly?
Basic Method To Clean A Laptop Fan
There are 2 main methods to clean laptop fans that are using or not using compressed air.
In other words, you’ll be able to choose between reaching deep inside the computer and cleaning each laptop fans blade or just using a powerful stream of compressed to push the dirt out. Depending on the ability and the status of dirt, we will need to choose the appropriate operation method.
Compressed air method
Air Compressor tanks will be the optimal choice if you do not want to interfere too profoundly inside the machine. This method is suitable for those who do not know how to disassemble each part without causing any damage. Besides, using this device to clean does not void the warranty of the machine.
However, you will have to spend extra money to buy a compressed air tank every time you need to clean it. And these gas cans are not environmentally friendly at all.
Without using air compressor
It is the most appropriate method if you can afford it and do not want to rely too much on compressed air tanks.
In the case of not using it, you are required to remove the case to clean the propeller. Although we can clean more stains and access hidden corners deep inside, in return, deep interventions will affect the warranty.
We also cannot ignore incidents that come from careless actions while acting with the bottom panel.
Necessary Tools To Clean Laptop Fan
With the compressed air unplug method, you only need to use at least one can of air to clean the laptop fans blades. However, if you want to minimize the amount of dust remaining, we can use two or more bottles.
In addition, you should also prepare a brush to collect the dust that is carried out by the air stream.
If you decide to disassemble the machine for cleaning, you will need to prepare some special tools to make the process easier and safer.
- First, you need to prepare a set of screwdrivers to change the size of the rotating head. In fact, we can use many types of screwdrivers of different sizes, but having to prepare dozens of tools to handle one screw will be extremely troublesome.
- Next, you need to prepare a soft lint-free cloth for cleaning and a specialized brush for sweeping.
- Last but not least are gloves or antistatic pads to protect the internal system.
Step By Step Cleaning Laptop Fans Using Compressed Air

Compressed air method
Here are the detailed steps for you to perform the method of cleaning laptop fans with blow compressed air and fan blades:
Turn off the power and unplug it
To ensure safety, you should stop all activities of the device as well as separate the machine from the power source before cleaning.
Locate the vents
To bring powerful air into the machine, you must determine the location of the vents. Often new laptop models will have more than one location for heat to come out, and these holes are usually located on the sides of the device.
Of course, some products have a different design when moving the air vent to the back of the machine.
If you can’t find it, you should refer to the instructions in the documentation that came with the device.
Use a can of compressed air to push the dust out
It would help if you placed the nozzle of the compressed air canister directly in front of the computer’s ventilation slot.
If this is not accessible, choose the place closest to the vents and place the nozzle there.
The following steps are to press the button on the can of compressed air to let the air spray directly inside the device and blow away the dirt.
Step By Step Cleaning Laptop Fan Without Compressed Air

Clean without a compressed air.
Here are 3 steps to follow to do this task perfectly:
Turn off the power and unplug it
With the need to interfere profoundly in the laptop’s structure, shutting down the machine and disconnecting the power supply is mandatory. To be safer, you can remove the battery of the device from its original position.
Remove the rear fender
Turning the laptop upside down to identify and remove the fixing screws is the next thing you need to clean the laptop fans. Unscrewing the screws is not too difficult, but please note the following two things.
First, don’t lose screws if you don’t want problems later, and second, wear gloves or place the device on an antistatic laptop cooling pad before handling.
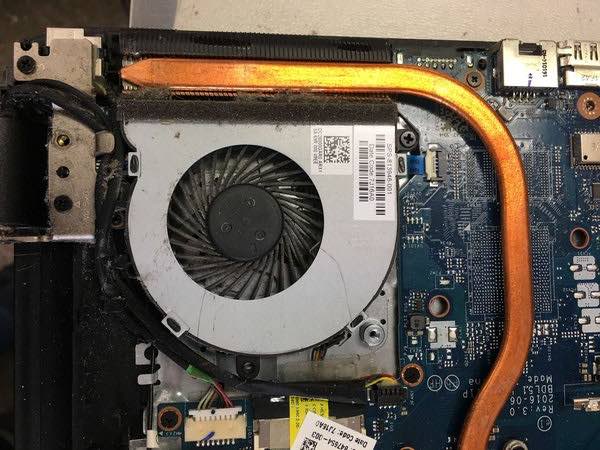
Clean the laptop fan
After removing the laptop’s protective sheet, there is a high chance that the fan will appear in front of your eyes. We will need to fix the fan with one hand while the other hand uses a towel to wipe.
Note that choose soft towels as well as avoid adding water or other chemicals.
After cleaning the cooling fan, you also need to blow all the dust in the vicinity, especially in the vent, one of the places where the most dust accumulates with a vacuum cleaner.
Reattach the protective plate
The final stage is to reinstall the protective plate to its original position, reinstall the battery and start the machine to check for any damage.
What To Do If Things Still Don’t Work?
In certain cases, your dusty laptop fan might be too old, and any repair tips won’t work. At this point, you can consider some of the following solutions:
Use more fans to support
After a long operation time, the fans inevitably degrade and no longer keep the same performance as they did at the factory. At this point, you will need to add to the device’s heat dissipation capacity with removable fans.
Today on the market, there are many models of support fans with different prices and sizes for you to choose from.
Replace fan

Replace a new fan
If the fan can no longer meet the cooling needs of the machine, it is best to replace it with another device. You can, of course, replace the cooling fan yourself if you can afford it, but it’s best to get the help of skilled professionals.
Bring the device to the store
Bring the device to the store
If you have tried all measures and the laptop is still hot, it is best to bring the device to the store or the manufacturer’s centers so that the experts here can check and repair it for us.
Conclusion
And above are all the necessary steps and guides for you to clean the fan on your laptop. Hopefully, the amount of knowledge that today’s article brings can help you in the process of cleaning and using your laptop.
Thank you for reading!

Paul Sullivan is the leading writer for articles on our website. He has over 10 years of experience as a technology reviewer, especially on laptops and computers.
With his long experience, we believe that he will bring you accurate and valuable knowledge and assessment.