
HP’s laptops are among the best products, but it’s not difficult to find out they are susceptible to faults and errors. Among those inconveniences, a bad battery might come sooner or later. That’s why an HP laptop battery troubleshooting is needed.
Contents

We know that as users, it’s incredibly frustrating to diagnose and figure out what is going on with your laptop on your own. No more further ado; let’s get into some of the most common problems with HP batteries.
HP Laptop Battery Troubleshooting
Faulty Power Supply Or AC Adapter
The first thing to check is to test your power supply and AC adapter. Make sure that the computer has the original adapter shipped with it.
Then, plug your AC adapter into a working power outlet, not via a surge protector, power strip, or secondary outlet.
Then, unplug the adapter from the PC, remove your battery inside the computer, re-plug the adapter to the charger port, and turn on your computer. If your laptop still works, as usual, skip this to check the battery itself.
Verify if the connection point between the charger port and the cord’s jack is secure and tight. If you try wiggling and it feels loose, the charger port might be defective. At this point, bring your PC to service.
Next, check the LED illuminator on the power button or light on your computer. If it’s off, continue checking the AC adapter.
If the illuminator on the AC adapter is not on while plugging into a functioning energy outlet, or it shows signs of damage on the cord or the power brick, consider replacing it.
Run Diagnosis With HP PC Hardware Diagnostics UEFI
To diagnose any problems with your external parts, such as the adapter, ensure it’s connected to the power outlet and PC.
Then, restart your computer. Once it’s on, please immediately press the F2 button repeatedly every second until you see the following display.
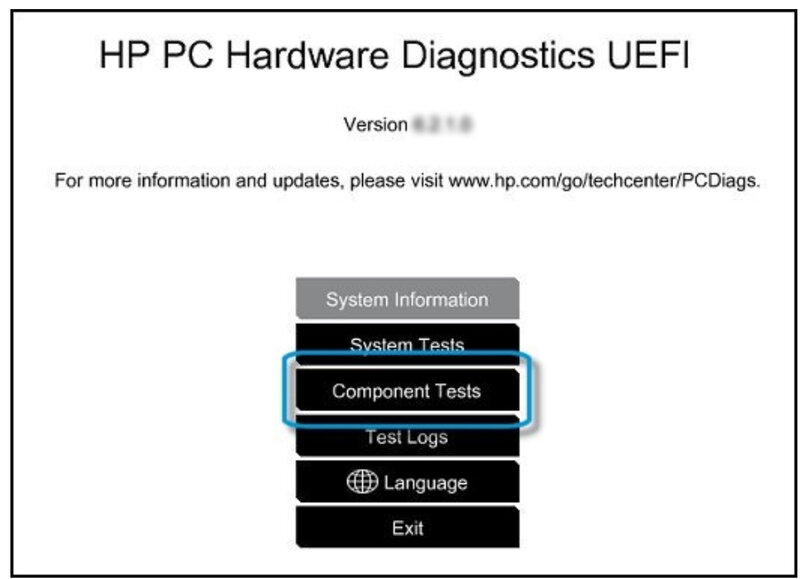
Follow this path: Component Tests > Power > AC Adapter > Run Once. After that, you can see if your adapter’s quality is passed or unqualified. If it’s unqualified, check with HP to see if your machine is warranty-covered and eligible for a replacement.
Note: In the Power screen, you can also choose to test the battery. It is one way to troubleshoot if the problem is within the energy cells.
If the battery’s status is anything other than Passed, check the cases below.
#Case 1: Status Calibrate
In this case, your cell is OK, but it needs calibration. If there’s an optional Auto Calibration, you should choose it.
Otherwise, you may need to calibrate the component manually, which can take up to several hours without use.
To manually calibrate the cell, do as follows:
- First, charge the battery to 100%, then restart the computer
- Launch the Hardware Diagnostics UEFI as instructed above; remember to unplug the AC adapter
- Run this path: Component Tests > Memory > Extensive Test > Loop until error
- Let the test run until the cell is entirely discharged and the computer turns off
- It should take several hours, please don’t use your computer during this time
- Plug the adapter again, keep charging the PC until the power illuminator turns from amber to white light
- Finally, turn on the computer to check the charged level. It should show 99% or 100% charged.
#Case 2: Status Weak Or Very Weak
This case indicates that your cell has experienced normal wear and tear for its lifecycle. Due to its chemical nature, a power unit will wear out over time, and its runtime will also diminish.
This should be expected if you have used the machine for more than a couple of years with hundreds of charge cycles. A worn-out battery can barely perform more than half an hour. In some cases, it will even go out before reaching 0%.
If this is the case, replace it with a new cell, and everything should be fine.
#Case 3: Status Replace
Your battery likely has experienced a critical failure; whether it’s due to wear and tear or damage, you should replace it.
#Case 4: Failure With ID Number
Write down the failure’s ID, then contact your service or HP support for further diagnosis.
#Case 5: No Battery
This case happened because the software couldn’t detect the battery.
For this situation, remove the cell to check if there are any problems with the connection points. Fix that and reinstall it and check again.
Another case is when you are using a new cell that HP does not recognize. In this case, consult your seller and make sure HP accepts the new component.
Check The Battery With HP Support Assistant
Like UEFI, HP Support Assistant is another utility that helps with troubleshooting.
To launch it, navigate to the search bar on Windows and type in HP Support Assistant. If it is not already on your computer, download it from here.
Next, run this path: My notebook > Battery > Run battery check.
After that, you will see the status of the power cell on the display. Refer to the above status in the UEFI section.
For Business Model: Use Battery Health Manager
This is a BIOS utility that is available on all HP business models since 2016.
To access it, do as follows:
- Restart the PC, ensure the AC adapter is plugged in
- While booting up, repeatedly hit the Esc key to launch Startup Menu
- Press the F10 key
- Then select Advance > Power Management Options
Then, you should see 3 options, namely, Maximize my battery health, Let HP manage my battery setting, and Maximize my battery duration. The first option will limit your battery’s maximum charge level to 80% to protect it. The second one will balance performance and runtime while letting it charge during a hot environment or under heavy load. The final one maximizes the runtime with a maximum level of 100%.
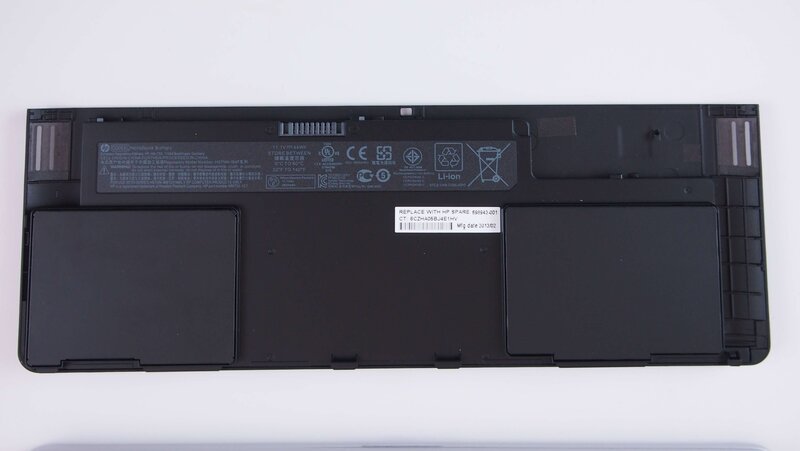
Troubleshoot An HP Removable Battery
Turn your laptop over to see if its cell is removable. If the battery is outside of the computer, uninstall it from the machine.
The first step is to check the connection points on both the cell and the PC’s compartment. If there’s damage to the connection point, replace it. If the damage is on the PC’s compartment, bring the laptop to service.
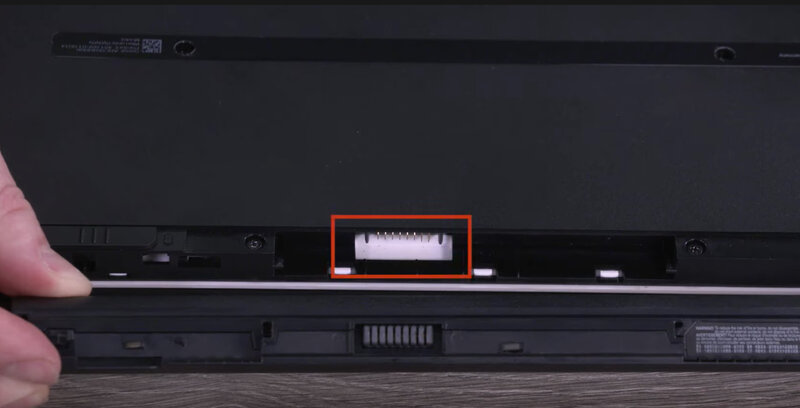
If you are lucky enough, the connection points are only dirty. In this case, clean them using a dirt-free Q-tip or a piece of cloth. Sometimes, debris and dust can block the electricity transmission for the power unit.
If there’s no problem with the connection points, re-install the power cell to your laptop. Next, disconnect every USB device from your PC, along with the power adapter. Re-introduce the power cord, then let it charge for half an hour.
After half an hour, unplug the power cord. Then, turn on your PC using the power button. If the PC is on, then the cell might be fine and functions as usual.
If not, bring your laptop to the service.
To Summarize
In conclusion, errors and faults always happen to electronic devices whether we want them or not. If they occur on your HP PC, the most important thing is to keep calm and follow the HP laptop battery troubleshooting to diagnose the problems on your own first.
If the problems are out of your control, don’t hesitate to bring the PC to a professional or contact HP’s support.

Paul Sullivan is the leading writer for articles on our website. He has over 10 years of experience as a technology reviewer, especially on laptops and computers.
With his long experience, we believe that he will bring you accurate and valuable knowledge and assessment.